Friday

Bouquet of Love & Memories!

Roses are red,
Violets are blue,
This bouquet of flowers,
I made for YOU!


Super simple to create and really inexpensive, you could create this gift in 15 minutes. Brilliant for a teachers gift too!  The flowers are on a 12x12 digital print (see below) that are just a drag and drop to do the photo. Easy to do with traditional scrapbook supplies as well, but it would cost you more that way. 


Super easy... get the flowers, pix and assemble. Then just adhere to shisk-kebob skewers and poke into floral foam in a vase. Oh, let's make one today!

Monday

Tangible Proof of God's Love!

So here's a cool thing.
Many churches around the country are wrapping "tangible proof of God's love" around those who need it most. Tangible proof? You mean something I can hold? Absolutely!

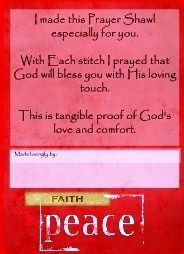
Introducing the prayer shawl!

Knitters work on a shawl in the softest of yarns to create a cozy wrap for hospital patients, women in crisis, those making long treks across the globe, new mother's with babies in the NICU - this list goes on and so does the ministry!  Those creating the shawl pray for the recipient while each stitch is cast. Since a shawl requires focus and time, there is a lot of love put into each one.

Each shawl from St. John United Methodist church will now come with a small card signed by the creator, making the gift that much more personal.


Cards created by: Jennifer Stratton - http://www.myphotofairy.com/ or (907) 350-1755 and retail for $25 for 54.


Tuesday

What is your Legacy?

This summer has been a difficult one for me.
Over Memorial Day weekend, I lost my dear Gramma Summer and just last week, my darling Grandmother Grace passed away. I was very close to both of them and each has influenced me over the course of my 38 years.  I alternate between joyful rememberance and heartbreaking sadness over the profound loss I feel.

In my grief, I have begun writing their legacy down. After all, as a personal publisher, isn't that what it is all about? I want my girls to know the incredible women that I knew and unless I pass that down to them, those women will be lost. I could not bear that.

Using a template from the extensive Template Gallery at http://www.myphotofairy.com/, I have begun to memorialize each of these dynamic women and I want to share this with you. To the right, you will see photos of my loved ones and below, you will see the beginnings of their legacy books.

With Story Maps to guide you, documenting someone's life doesn't have to be an overwhelming process. Step by step, you can have a leather bound, coffee table style book that will be almost as revered as the person it is about. But I suggest you start now. Don't wait until they are gone. Start today.
To view the book at it's best, click FULL SCREEN.

If you are ready to begin a Legacy Book, visit http://www.theyoulibrary.com/ today. 

Wednesday

Puzzle Blocks are coolio!


Super fly project idea! Puzzle blocks have been around for centuries and this one was a delight to create.

You can make the final puzzle any size, but I'm loving the 6x6 size; nine 2 inch blocks. Here's how to do the project.

The cubes have six sides, so you'll need to use two 12x12 sheets. You can create them with scrapbook supplies or my preference, with in Heritage Makers Studio; four to a page. Add words, pictures and art until you have a complete square for your puzzle.

Then publish and when the sheets arrive just ten days later, separeate and adhere to your blocks with Modge Podge or puzzle glue. Way cool and what a fun gift this would make! Here are some of my other sides... soon to arrive!

Friday

Holy cowlita! Create house numbers?!

This completely simple and beautiful project knocked my socks off. I feature the work of Deb Jones from time to time and I truly can't wait to see what she comes up with next! Today's offering: Address Numbers!

How in the heck did she do this?
A 12x12 digital scrapbook page and some Modge Podge!
Choose the tile holder you want to use and buy the appropriate size tiles to fit. Here are some websites to find tile holders:
http://www.thelasershoponline.com/metaltileframe.html
http://www.directfrommexico.com/mi2119-2.html
http://www.simply-sublime.com/Tumbled_Tile_Plaques.htm
http://www.thefind.com/garden/info-address-tiles
You can find 3x3 tiles inexpensively at your local hardware store.
Then, login to your Heritage Makers Studio account and start a new project. Add your photo background to fit the tile size and publish. These are 3x3, so twelve numbers would fit on one page!
When your page arrives, cut the 6x squares apart and modge podge to the ceramic tile. I would suggest a sealant as well, since they will weather the elements. Considering that 1 digitally created page is merely $4, these are a STEAL! Way to go Deb! Keep those ideas comin'!

Thursday

Put that on a coaster, will ya? Don't have a coaster? Let's MAKE SOME!

It’s the digital scrapper and home crafter’s perfect project. And with Heritage Makers, this project has never been easier. It’s time to get rid of those old, gross-looking coasters and replace them with personalized ones. You can include your living room’s color scheme and even your family photos.

Here’s what you need:
•Blank wood or chipboard (or another material if desired) coasters – You can get these from a craft store. For this project I used 3×4 inch coasters with rounded corners from Robert’s Craft online.

•Scrap page (for this project I used a 12×12 scrap page) which is in the template gallery!

•Mod Podge

•Spray sealant

•Wood/craft paint (any color)
Get started:

1.Design your coasters in Studio on a scrap page (whatever size works best to fit all your coasters on a page or two).

2.Paint the bottom and sides of your wooden coasters. You may also paint the top of the coasters if you are planning on not covering the entire surface with your digital-designed coasters.

3.Once you have your printed scrap page, cut the digital-designed coasters out.

4.Using Mod Podge, glue each digital-designed, cut-out coaster onto the top surface of your wooden coasters.

5.Let the Mod Podge dry.

6.Seal your coasters using a spray-on sealant. (Note: You’ll want to use the sealant in a ventilated area.)

7.And voila. You now have fun coasters you’ll be proud to display in your living room!

Monday

Sometimes an Idea Just Has to be Shared!

Ok, so I write my own blog, but... sometimes another idea is SO good, you have to share it. This idea and post came directly from The Heritage Makers Official Blog. It's so, so, good. Not mine... please note, someone brilliant named Sara posted this idea. I'm just reposting brilliance.

A canvas doesn’t have to be just a canvas. You can easily turn it into another creation—a bulletin board or a magnet board. Instructions for a bulletin board and magnet board are virtually the same. For our purposes (and because I like the idea of a magnet board better—no holes through the canvas), we are going to focus on a magnet board.

Items needed:
  • A Canvas print created at http://www.myphotofairy.com/ If you like the one pictured, you'll find it the Template Gallery!
  • A magnetic metal sheet 1 1/2 inches smaller than the canvas on all sides
  • Heavy-duty staple gun
  • Duct tape
Instructions:
Create a canvas, any size (I suggest the bigger sizes—not an 8×8 or the 8×20). Put any design and any photographs you want. Then publish and order it. Once your completed canvas arrives, you continue with the next steps.

Place the metal sheet behind the canvas. (You can get a metal sheet from a home improvement store—you may have to cut it down to size—or from a metal supply shop.

Staple the metal sheet into the canvas frame as you would a picture in a picture frame. You’ll want make sure the staples are close enough to the canvas to secure the metal sheet in place, but far enough away so you don’t puncture the canvas.

Optional: instead of stapling the metal sheet into the frame, you can use a strong tape (such as duct or gorilla) to attach the metal to the back of the canvas, as shown below.


Once you’re finished, place the new magnet board on your wall. You now have a decorative and useful addition to your home!

Sunday

Create personalized party supplies easily!

Creating your own personalized party supplies is a snap with online, web-based digital publishing software!
You can make invitations, games, placemats, cup holders, party bags and more and everything matches with high quality printing. Beautiful! This pin the nose on the clown game is 18x24 and cost about $20. The invitations are below and were double sided for $1.29 each! Plus, with the click and ship service, the company stamped, sealed, addressed and mailed them for us! Simple AND affordable!

Saturday

Setting the table!

Ok, so this was a fun project to put together! I wanted to make something for my youngest daughter to use at the table to assist with her new found reading skills. I simply used a 12x18 poster, landscape view and set to work. She loves it and has the words; cup, plate, fork and spoon down pat!

Even better, she can't wait to set the table and she knows where everything goes!

Thursday

Graduation Announcements with Flair!

A darling and dear friend of mine is graduating from high school this year. She mentioned she might like to have me help her with her graduation announcements and truly honored, I set to work immeadiately. Armed with incredible photos (taken by Anchorage photographer Nicole Bickford) my job was half done. I was immediately smitten with one photo in particular and it brought to mind that famous Robert Frost poem, The Road Not Taken. An easy match, I paired the two and this is what I came up with!

Completely customizable, senior graduation cards can reflect your personal style and tell more about you than your graduation date. Cost for these 5x7 double sided cards with envelopes are $130 for 100, plus a nominal design fee.

Contact Jennifer to arrange for a your senior cards today!
http://www.myphotofairy.com/ or (907)350-1755